
Screen Printing Hand Drawn Designs with Grain Mark Screen Film
We often talk about creating digital images to make exposed screens but there are a lot of ways to use hand drawn designs that bypass the need for computers at all – hooray! Grain Mark Screen Film allows you to draw directly onto a screen film whilst maintaining all your lovely textural marks. Charcoal and black oil pastels work particularly well. Here’s a project using Grain Mark Screen Film to print some fabric:
Use charcoal and oil pastels to draw your design on the rough side of the film.


Degrease and dry a 43T meshed screen and coat with sensitised photo emulsion. Dry in the dark. When dry, expose your design onto the screen using an exposure unit or light.

When your design is exposed, wash your screen with a hose. The marks should wash clean, leaving open areas of mesh for the ink to pass through.

This type of screen film is a little more unpredictable than a digitally printed screen film. Lots of texture is achieved from our charcoal and oil pastel marks.

Pin out your fabric on a slightly padded surface. We use an old army blanket tied down with a piece of thick cotton on top. Tape the edges of your screen with parcel tape.
If you’re printing a repeat pattern, you can use the screen and the film to mark out where the screen should be placed each time. Place the film where you want your pattern to be printed. Place your screen on top and use masking tape to mark two of the corners. Lifting your screen up slightly at one end, remove the film and slide it beside the pattern on the screen. You can see how it will meet the previous print through the translucent mesh. Move the screen on top so the pattern lines up and mark the corners again. Do this all along one row of your fabric.

With the screen in its first position, scoop a row of ink along the top edge of the screen. Use your squeegee at a 45 degree angle to drag the ink down the screen, pushing it through the mesh. This movement should sounds like a tent zip.


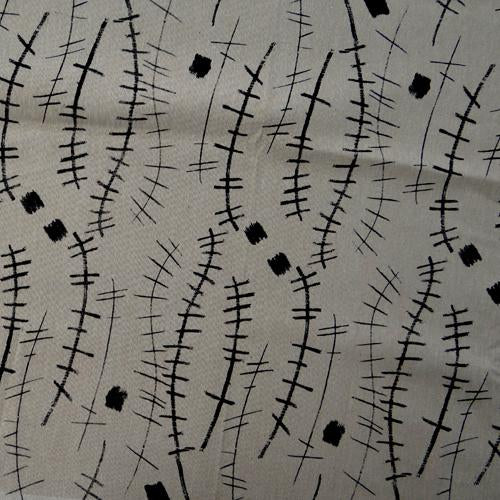
Your print should have some great texture – this one has even more because of the rough linen used.

Lift your screen and place it down in position 3 using your masking tape markers. We’re skipping position 2 so that we don’t place the screen on top of a wet print!
Continue along the row in alternative positions.

When you’ve finished your row you can go back to print the gaps in between. If your prints are still very wet you can scoop the excess ink back into the pot and use a well wrung out soft car sponge to gently wipe the ink out of the mesh on both sides. This will ensure that no ink will dry on your screen whilst you’re waiting for your print to dry. This is a great practice to use when you’ve got to take some time between prints to re-pin fabric, re-lay t-shirts or just for a tea break!
When you’re ready, ensure your screen is dry. You can gently wipe with a tea towel to remove any drips. Place your screen down in position 2 and print as before. Move the screen to print in all the gaps left along your row.

Wipe down and dry your screen again and then use the same method to mark out the positioning of your next row.

Print along the row as before, in alternative positions…

…and then back along again filling in the gaps.

Your final fabric should be a repeat pattern such as this! You could also use your print in a random scattered pattern or on its own! When your prints are dry they can be ironed to fix the ink.
To print your own fabric you will need:
- Grain Mark Screen Film
- Charcoal
- Black oil pastel
- 43T screen
- Squeegee
- Exposure unit (or light set up to expose screens)
- Dark place to store your drying screen
- Hose or wash out booth
- Parcel tape
- Padded surface
- Pins
- Fabric to print on
- Fabric Screen Printing Ink
- Spatula
- Masking Tape
- Iron