Screen Printing onto Fabric Workshop

Hello, My name is Hayley and for the past week I have been at Handprinted for work experience. I have loved every minute of it especially when I took part
in the screen printing work shop onto fabric. It was my first time screen printing and I cannot wait to do it again. We began the workshop with screen
printing using a paper stencil where the lovely Shirley did a tutorial on preparation and stencil cutting.

After preparing our screens, choosing a design and cutting out our stencils it was time to do my first print ever which was very exciting. I really enjoyed
using the paper stencils as it demonstrated another way to screen print not using exposure. I also enjoyed seeing what everyone else had made using
their paper stencils, we had a a wide variety of prints from stars to clouds in an assortment of vibrant colours.

Once we had practised and got a good technique we could move on to a larger piece of fabric and choose our final designs. We could either use a mix of
paper stencils and screen exposure or just go straight on to the exposure technique. I choose to incorporate both as I really liked using the paper
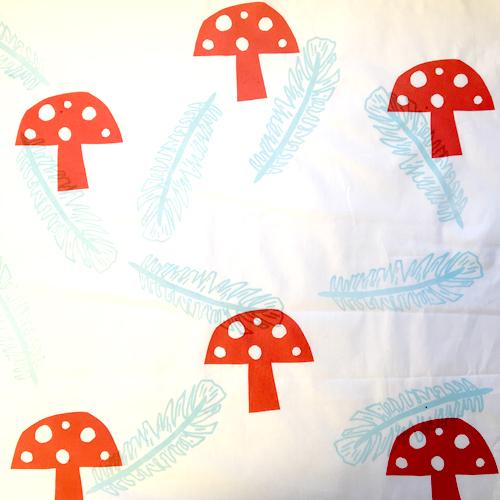
stencils. For my final design I wanted to use elements of nature so for the paper stencil element I cut out a toadstool and made up a vibrant red dye
(which turned out to be extremely difficult to make).


The next step was to prepare our screens for exposure – this meant drawing our designs onto film and putting the green emulsion (which oddly smelt like
PVA glue) onto our screens. This bit was slightly scary as it was difficult to get the right technique in order to not spill the liquid everywhere
and to get a nice even spread. We than left the screen in a dark heated cupboard for 20 minutes – during this time we got to enjoy our lunch.

Our next job was to use the exposure machine which went on for 5 minutes 30 seconds with our screens and designs in. We quickly jet washed the loose
emulsion off before it set leaving us no design left to print (which would have been very disappointing). Once we dried the screen it was ready
to print!


To print my feathers I used a gorgeous duck egg blue as I believed it would compliment the vibrant red. This part was extremely interesting as you
got see everyone’s designs and placements of the screen. Below are some of the final products.


At the end of the session I had some time to experiment with my screen so I tried to make and ombre using red and purple colours.- This was very fun
as I did not have to worry about being exact.

I really enjoyed this workshop (and my entire experience at Handprinted) and would recommend the workshops to anyone no matter your ability of printing.
The whole team here are so lovely and accommodating plus, if you are lucky, you may even get free tea and cake (or coffee if you prefer.)
