
Creating Cyanotypes using the Speedball UV Lamp
Cyanotypes are made using a light sensitive solution to create designs on fabric and paper. Prints are typically created using direct sunlight. Unfortunately here in the UK, sunshine is often in short supply! But we have discovered a work around using the Speedball UV Lamp, a cardboard box and some tin foil. This means we can make beautiful cyanotype prints all year round!
For this project we're going to need a cyanotype kit. The kit contains two bottles, each with powder in the bottom. Fill each bottle with water to make two separate solutions (we mix them just before using). It’s best to add water to the bottles 24 hours before you intend to use them, and make sure to give them a good shake so all powder fully dissolves.

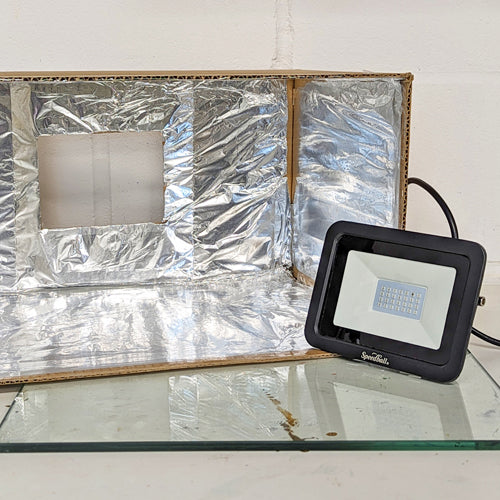
Before we start we need to assemble our 'exposure unit'. We used an old Cranfield box to make ours but any cardboard box will work, as long as it is larger than the paper or fabric you are going to be using. We started by removing the bottom box flaps and cutting a rectangular hole out of the top just smaller than our Speedball UV Lamp (approximately 14.5 x 11cm). We then lined the inside with tin foil to help reflect the UV light during the exposure time. The tin foil inside the box will help to intensify the light as it will bounce off of the walls.

When you’re ready to make your cyanotypes you'll need to combine the two solutions together. Work in a space with very subdued lighting if possible and mix the two solutions together in equal quantities. There’s no need to mix the whole amount together at once: it’s better if you only mix what you need as the life of the mixed solution is only a couple of hours.

You can make cyanotypes on fabrics or paper – experiment with different surfaces. Once the cyanotypes are made they will be fixed and washable.
Paint the mixed solution onto your paper or fabric and leave to dry in a completely dry and dark space – a closed cupboard or box works well. The mixture will stain so be sure to lay down a protective surface first.
After an hour or so, these should be dry. Make sure to cover them up whilst moving them to your exposure area. Placing them between two trays works well.

For this next step you want to again work in subdued lighting to prevent the solution from over exposing. When you are ready, place your paper or fabric down on a flat surface and place your film negative or chosen objects on top. To ensure direct contact between your negative/objects and the coated paper, we have found it best to place a sheet of glass over the top.

Once everything is in position place your DIY exposure box over the top and place your Speedball UV lamp directly over the window you have cut out. When you're ready to go, turn the lamp on and set your timer for 15 minutes. Timings may vary depending on the image you are using. For our image, we found that 15 minutes was sufficient.

As the cyanotype solution exposes it will start to turn from green to blue and then bronze. Cyanotypes will be paler if they’re under-exposed. This is how ours looks straight after the 15 minute exposure.

When your print has finished exposing, remove your paper or fabric from under the glass and immediately place it into a shallow bowl or tray of water to stop the exposure process. If you are working on a print run, this is a great time to get your next print set up and exposing. After 5 mins, remove your print from the water bath and rinse it under a tap until the water runs clear. Leave your print to dry, ideally between some blotting sheets.

For this project you will need:
- Cyanotype Kit
- A container to mix the solutions into
- Paintbrushes
- Fabrics and papers
- A dark space
- Something to carry the dried fabrics and papers in (e.g. an opaque black bag or two trays to put them between)
- Objects to use as masks or a printed negative
- A cardboard box
- Tin foil
- Speedball UV Lamp
- Timer
- Cold running water and a large bowl