
Halloween Printing with Night Glo Acrylic Ink!
If you’re a Halloween lover this project is for you! We’ve had a go with Speedball’s Acrylic Night Glo Ink and made our own glow in the dark Halloween poster. This ink really gives your prints a twist – it would be great for children’s (or adults’!) bedrooms too.
This project uses paper stencils to create a two layered print on paper.
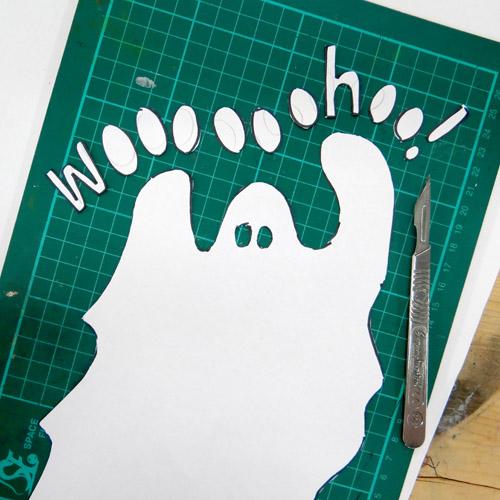
Start by drawing the designs onto copy paper – we’re using A3 80gsm paper. 80gsm is perfect for paper stencils. It’s thin enough to give crisp edges but thick enough to withstand a good number of prints.

Both masks and stencils can be used for screen printing. This first layer is made up of masks – a solid shape that blocks out the ink, leaving white areas. Our next layer will be a stencil – a solid piece of paper with holes cut out to let the ink through.

A hinged board is very helpful when screen printing onto paper. Hinge clamps are attached to a board, a screen is held in place, allowing you to lift it up to place your paper. The screen will go down in the same place every time.
Tape the edges of the screen with parcel tape on the front and back. If using masks, you’ll need to tape an aperture that will let the ink through. A right angle ruler can be useful to get this square. We’re using an A3 screen with 90T mesh. After the screen is taped, attach it to the hinge clamps.

Place a piece of paper on the board and then place the first stencil or mask on top. Use masking tape to mark where the corners of the paper will go each
time a print is taken.

Make sure the whole design fits in the aperture.

When you’re happy with the position, scoop a line of acrylic screen printing ink along the top edge of the screen.

Hold the screen slightly up and away from the board. Use a squeegee at a 45 degree angle to lightly drag the ink down the screen – this is called flooding the screen. Place the screen down onto the board and pull the squeegee down the screen again, this time with no extra ink. Push hard. You’ll know you’ve printed the entire design when no areas appear shiny. If they are, pull the squeegee down the screen again, pressing hard.

Lift the screen to reveal a print.

Place the print to one side and lay down another piece of paper. It’s important to work quickly and not let any ink dry in the mesh. To flood the screen with ink, lift the screen slightly and push the ink back up the screen with the squeegee. Print again by placing the screen down and pulling the squeegee hard down the mesh again. Continue for the whole edition.

When the edition is finished, peel the paper stencils from the mesh. Use a spatula to scoop off any excess ink back into the pot. Use a soft sponge and
a bucket of cold water to gently clean the mesh to remove any ink. Let the screen dry. Leave the screen in the hinge clamps ready for the next layer.

Layer two of our design is printed in Speedball Acrylic Night Glo Ink.
This ink is a very pale, milky green colour that shows up very slightly on white paper but glows in the dark!

Place a print back onto the board using the masking tape corners to get it into position. Place the next stencil on top. You should be able to see the first layer through slightly to help place the second layer.

Scoop some ink onto the screen in a line slightly wider than the design.

As before, flood the screen and then press firmly with the squeegee to print. It may be necessary to pull the squeegee down the screen a couple of times to get a clear, solid print with the Night Glo ink.

The Night Glo print will be very subtle on the paper. It may show up more on darker areas than on the white (see the dots in the eyes).

The print should glow in the dark!
(Note how the dots in the eyes do not glow as much as they were printed onto a dark ground.)

For this project you will need:
- Copy paper for stencils
- Cutting board
- Scalpel
-
90T screen for printing
onto paper - Squeegee
- Parcel Tape
- Scissors
- Hinge Clamps on a board
- Masking Tape
- Black Speedball Acrylic Screen Printing Ink
- Night Glo Speedball Acrylic Screen Printing Ink
- Spatula
- Bucket and soft sponge