
Mark Making - Using Resists
Using tools on your plate isn’t the only way you can create marks within an etching. You can also use resists to stop the mordant from reaching the surface of your plate. Resists can help achieve more subtle marks and washes, and they can also be applied using a brush to control their application.
We gathered up the standard resists used for aluminium plate etching - as well as a few wild cards to see how they would resist. We found out that some are not as strong as others, but enjoyed the subtle marks created with this experiment.
This blog is part of a series featuring tips and techniques to get you started with aluminium or zinc plate etching. This post will demonstrate the range of resists you can use to create subtle marks and tones within your etching.

We tested the following resists:
- Stop-Out Varnish
- Screen Filler
- Acrylic Paint
- Melted Wax
- Wax Crayon
- Waterproof Markers (Posca, Sharpie, Zig Opaque and Film Marker)
- Photo Emulsion
- Acrylic Screen Printing Ink
- Acrylic Wash (1 Part Acrylic Paint to 7 Parts Water)
- Water-based Block Printing Ink
- Nail Varnish
- Lipstick
- India Ink
You can use resists with a fresh plate, or use a previously etched plate. Whichever you chose to start with, it’s important to degrease your plate first. Follow the degreasing steps as outlined in this blog. For this process, grounds are not needed when applying resists.
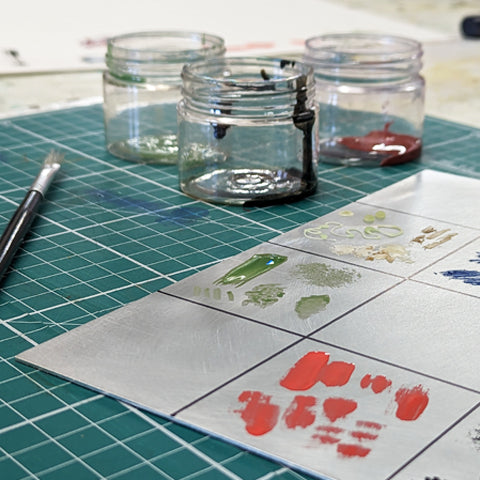
First, we planned how we were going to mark our test plate. We divided the plate into segments, one for each resist we planned on testing, and drew the segments on with a Sharpie Pen.

Then we applied the resists to the plate. Some were applied with a brush, and we selected a range of brushes with strong bristles. We also tried a dry-bristle effect with some of the resists.


We allowed the resists on the plate to fully dry, and then we taped up the back of our plate using plastic parcel tape to protect it from the mordant. We recommend leaving a longer piece on the top and fold it over to make a little handle. This makes it easier to lift the plate out of the copper sulphate solution.

We set up two plastic trays side by side. Wearing goggles and gloves, we poured our copper sulphate solution into one tray, and prepared 2 inches of water into another tray.

Following a test strip that shows the strength of our mordant, we decided to set our stopwatch to 30 seconds. Wearing gloves and goggles, we carefully placed our plate into the copper sulphate solution and started our stopwatch.

When the timer was up, we removed the plate from the mordant bath. We immediately placed the plate into the water bath to remove any remaining copper sulphate solution. We used a feather to lightly remove any copper particles.

Once rinsed, we removed our plate from the water bath. We could see that the exposed areas on the plate looked slightly darker and discoloured.

Next, we cleaned off our resists using Zest-It and a dry rag. Some resists were harder to remove, so we had to use a little white spirit. If you need to use this, remember to ventilate your room. As we cleaned our plate, we could see how the resists had worked.

Next it was time to print our plate and get inky! We used Caligo Safe Wash Etching Inks by Cranfield. We find they are easy to use and clean up quickly with just a bit of soap and water. We squeezed out a small amount and used a palette knife to loosen up the ink.

Using a piece of mountboard, we scraped the ink across the surface of the plate in one direction. We then rotated the plate 90 degrees and pulled ink across the alternative way.

When the plate was thoroughly coated, we then used some scrim to work the ink in circular motions. With this twisting motion, we’re pushing as much ink as we can into all the little etched marks.

Next, we polished the plate with a clean cloth rag first and then some tissue paper. Try to do this part with flat contact, and a flat palm - don't bunch up the material. Be careful not to over-polish - if you polish too much, you might remove too much ink which would result in a pale print.

Our plate is ready to be printed. The plate looks blue as there is ink still in the grain of the metal, and paler where the resists where. We’re using an aluminium plate, which will never get fully clean or provide bright whites.

Using soaked and blotted Snowdon paper, and we took a print using our etching press and blankets.

Now we have a handy reference point for all the types of marks we can make with resists. We can use this print when planning out our future etchings. Click here to see a larger version with annotations.

More Tips
- Remember not to touch your plate after you’ve degreased it. Your hands will naturally be slightly greasy, and fingerprints will act as a resist!
For this project, you will need:
- Aluminium or Zinc Plates (degreased)
- CIF Cream or other degreaser
- A clean scouring dish sponge
- Various resists to try out
- Copper Sulphate Mordant (Mixing Instructions)
- Plastic Parcel Tape
- Two Plastic Trays
- A Stopwatch
- Zest-It
- Paper for Intaglio, such as Snowdon
- Blotting Paper
- Caligo Safe Wash Etching Inks by Cranfield
- Scrim
- Tissue / Clean Dry Cloths