
Mark Marking - Using Etching Tools
When you’ve degreased and prepared your plate for etching, there are a variety of tools you can use to mark into the surface. Any marks made into the surface of the grounds will expose your plate to the mordant. When etched, these marks will become sunken areas for ink to sit, which will be printed through the intaglio process.
This blog is part of a series featuring tips and techniques to get you started with aluminium or zinc plate etching. This post will demonstrate the range of tools we stock at Handprinted, and what marks they can make.
First, we planned how we were going to mark our plate. We had 18 tools to test, so we made a plan to divide our plate into 18 sections.

We tested:
- Etching Needles to create thin and fine lines
- A Drypoint Needle to create thin and fine lines
- Roulettes to create shadows and tones through micro marks.
- Burnishers, to erase mistakes or provide smooth areas for highlights.
Next, we degreased our plate and dried it off with a hairdryer.

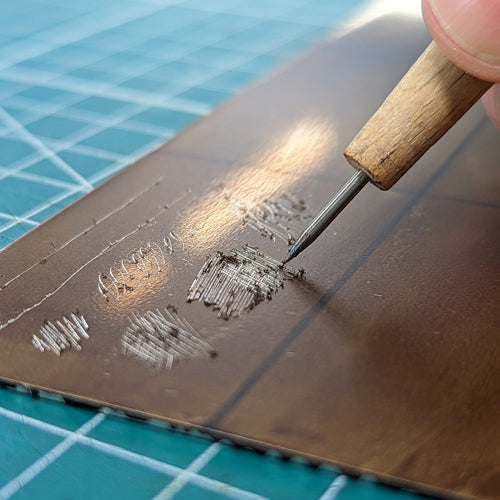
We carefully drew out a grid for 18 sections using a sharpie pen, taking care not to touch the surface with our fingertips.

We then coated the plate in hard grounds, as outlined in this earlier blog post.

Following our original plan, we then made a variety of marks with each of the tools. You only need to scrape into the waxy grounds and not into the plate.

We set up two plastic trays side by side. Wearing goggles and gloves, we poured our copper sulphate solution into one tray, and prepared 2inches of water into another tray.

We taped up the back of our plate using plastic parcel tape to protect it from the mordant. We left a longer piece on the top and folded it over to make a little handle. This makes it easier to lift our plate out of the copper sulphate solution.
Following a test strip that shows the strength of our mordant, we decided to set our stopwatch to 8 minutes. Wearing gloves and goggles, we carefully placed our plate into the copper sulphate solution and started our stopwatch.

When the timer was up, we removed the plate from the mordant bath by using the plastic tape handle. We immediately placed the plate into the water bath to remove any remaining copper sulphate solution. We used a feather to lightly remove any copper particles.

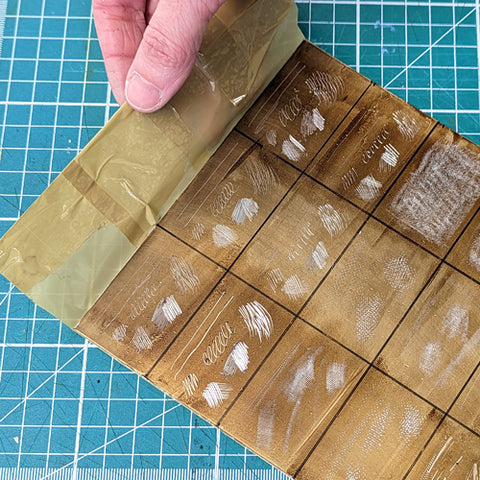
Once rinsed, we removed our plate from the water bath. We could see that all the marks in our segments had etched slightly. We used a needle tip to feel the depth of the marks, and to see if our plate required any further time in the copper sulphate solution.

Next, we cleaned off our grounds using Zest-It and a dry rag.

One last step before we print – as per our plan, we used burnishers to smooth out some areas we etched earlier. These tools are used to correct mistakes, smooth out imperfections or create a brighter tone.

Now it’s time to print our plate and get inky! We’re using Caligo Safe Wash Etching Inks by Cranfield. We find they are easy to use and clean up quickly with just a bit of soap and water. We squeezed out a small amount and used a palette knife to loosen up the ink.

Using a piece of mountboard, we scraped the ink across the surface of the plate in one direction. We then rotated the plate 90 degrees and pulled ink across the alternative way.

When the plate was thoroughly coated, we then used some scrim to work the ink in circular motions. With this twisting motion, we’re pushing as much ink as we can into all the little etched marks.

Next, we polished the plate with a clean cloth rag first and them some tissue paper. Try to do this part with flat contact, and a flat palm - don't bunch up the material. Be careful not to over-polish - if you polish too much, you might remove too much ink which would result in a pale print.

Our plate is ready to be printed. The plate looks blue as there is ink still in the grain of the metal. We’re using an aluminium plate, which will never get fully clean or provide bright whites.
Using soaked and blotted Snowdon paper, we took a print using our etching press and blankets.

Now we have a handy reference point for all the types of marks we can make with our tools. We can use this print when planning out our future etchings. Click here to see a larger version with annotations.

For this project, you will need:
- Aluminium or Zinc Plates
- Hard Grounds
- CIF Cream or other degreaser
- A clean scouring dish sponge
- A Teppanyaki Grill or Hotplate
- A Roller
- Etching Tools
- Sharpie
- Copper Sulphate Mordant (Mixing Instructions)
- Plastic Parcel Tape
- Two Plastic Trays
- A Stopwatch
- Zest-It
- Paper for Intaglio, such as Snowdon
- Blotting Paper
- Caligo Safe Wash Etching Inks by Cranfield
- Scrim
- Tissue / Clean Dry Cloths