
Paper Stencil Screen Printing
A quick introductory guide to screen printing with a paper stencil.
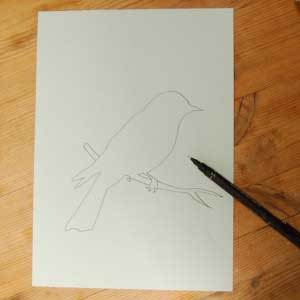
Step 1
Draw the outline of the image you wish to print.


Step 2
Using a craft knife, cut out the image. You want to keep the outline of the image and any infill pieces.


Step 3
Stuff the garment with a sheet of newspaper to stop ink reaching the rear of the garment.


Step 4
Position your stencil where you want the image to be, remembering to position any infill pieces.


Step 5
Lay your taped screen onto the stencil. Check there are no gaps around the outside of your stencil. If there are add an extra layer of tape.


Step 6
Put a thick bead of ink along the top edge of your screen.


Step 7
Flood your screen with ink by pulling the squeegee across it lightly at a 45′ angle. Then repeat with a little force, when you have printed correctly there should be no ink on top of the mesh and the noise of the squeegee pull should sound a bit like a zip!


Step 8
Lift the screen from your garment by pressing on one side and lifting the other (a bit like opening a book). Leave the garment to dry and then iron to fix.
You will need:
- Screen
- Squeegee to fit
- Paper to cut your stencil – photocopy paper is good – layout paper is better
- Craft knife
- Water-based fabric ink such as Speedball
- A padded surface to print onto – a folded sheet is good
- A Garment
- Newspaper