
Soya Wax Batik
There are several waxes that can be used for making batiks, all of which will produce slightly different results. Standard Batik Wax is a blend of beeswax and paraffin wax but soya wax makes a good alternative. Soya wax is more sustainable, plant based, natural and petroleum free wax. Our soya wax comes from renewable sources.
There are a few differences between making a batik with paraffin and beeswax and making a batik with soya wax – soya wax melts at a lower temperature and is easier to remove from the fabric when the batik is finished but soya wax is more vulnerable to dye and soda ash so dye can occasionally spread under the wax. Here’s a project to show some of the pros and cons of soya wax:
Start by stretching your fabric over a frame. We’re using Prima,
a light weight white cotton, with a wooden batik frame and silk pins.

Heat the soya wax in a Tixor Malam Wax Pot. The soya wax will start to melt quicker than batik wax. Be sure to use different tools and a different pot when using soya wax. To use tools than have been used with other waxes, wipe them clean with a solvent to remove any wax residue.
Use a tjanting to outline the inside edge of your frame. Different tjantings have different sized spouts so choose a mid-weight line like a size 2. For larger spouted tjantings you may need to move faster along the fabric to avoid blobs. Try a few tjantings to get a feel for which suits your drawing style and speed. Holding the tjanting spout against the fabric at a slight tilt (but not so much that it spills!) should produce an easy line. It can be useful to have a piece of kitchen towel or a rag in your other hand to catch the drips.

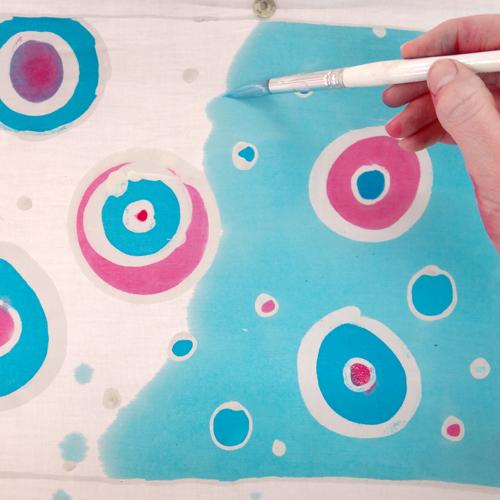
You can also use brushes to apply the wax. Use only natural bristle brushes as plastic bristles will melt in the wax (!). Keep the brushes hot in the wax pot and transfer them quickly to the cloth to paint your wax. Keep dipping into the wax pot so it doesn’t cool down.


Use empty kitchen rolls and tape rolls to stamp wax onto the fabric. Dip the tools into the wax for a couple of seconds and then stamp onto the fabric. Don’t leave these in the wax pot.


After your first waxing you’re ready to dye. Mix 5tsp of urea (colour brightener), 2 tsp of soda ash (fixative) and 1/2 tsp of calgon (if you’re in a hard water area) with 1/2 litre of warm water. This is your chemical water. This solution will work for a couple of hours and will need to be replaced after this time in order to fix your dyes.

Separately, mix 1/2tsp of Procion MX dye with 50mls of cold water. Do this for each colour you would like to use.

To mix a colour, use a pipette to select the liquid dyes and mix into a pot. Top up the dye with the chemical water. You want at least an equal amount of chemical water to dye but you may want more for a paler colour. Once you’ve added the chemical water, the dye can be used for a couple of hours.


Use your dye to paint the fabric. The dye will naturally spread and flow to the wax edges so it’s better to use less dye and let it spread naturally, coaxing it to the edges if it does not reach.


When your fabric has been dyed it needs to dry completely before your next layer of wax can be applied. If you can, leave your dye to dry naturally over night so that the dye can properly fix to the fabric. If you’re in a rush, use a hair drier on a cool setting so as not to melt the wax.
Your second waxing will preserve any areas of colour that you want to keep and all remaining unwaxed cloth will be open to another layer of dye.
You can tell that the wax has penetrated the fabric if it appears darker than the cloth. If it looks white it is sitting on the surface of the cloth and dye will be able to get underneath. If this is happening, either your wax is too cold or your fabric is damp. Make sure your fabric is completely dry and dip your tools into the wax often, leaving them to heat up in between uses.

Soya wax seems slightly less suited to heavy layering than batik wax. The subsequent layers of wax seem to sit on the surface more and are more susceptible to flaking off.
After your second waxing, add another layer of dye. Remember that dyes are translucent and the base colours will come through. Here, turquoise dye is being
painted over magenta to produce purple. The pink lines left behind have been waxed.
Soya wax is more vulnerable to dyes so some dye may start to seep into the wax and get onto the cloth underneath! To avoid this where possible, it’s best not to pool the dye on the fabric.

A paler pink has been added to the background to make purple.

Again, it’s better to leave your dye to dry naturally as the dye will fix better.

When your batik is dry, iron between pieces of newspaper to remove as much wax as possible. If you want to remove all of the wax, soya wax can be removed with warm water. Watch this space for updates after we wash this one! We’re also going to experiment with crackle and dip dyeing using this wax and will update with the results…
When choosing your wax, here’s a few things to remember:
-
Soya wax melts at a cooler temperature than standard batik wax.
-
Our soya wax is manufactured from renewable sources, more sustainable, plant based, natural and petroleum free.
-
Soya wax is more vulnerable to soda ash so dye can start to seep into the wax. It’s therefore not ideal for dip dyeing or crackling – watch this space for the results!
-
Soya wax is easier to remove from fabric than batik wax as it does not need to be boiled out. It is therefore well suited to batiks on silk.
-
It’s more difficult to build up layers of soya wax than batik wax as it may start to peel off
-
All tools used for Soya Wax batik should be used just for Soya Wax and cannot be used with Paraffin/Beeswax without cleaning with solvents.
For this project you will need:
- Soya wax
- Wooden frame
- Silk pins
- Thin cotton
- Tjantings and natural bristle brushes
- Tixor Malam wax pot
- Procion MX dyes
- Soda Ash
- Urea
- Calgon
- Pipettes
- Measuring jug
- Measuring spoons